#1944Revisited – Locating Japanese Radars: The First Dedicated Radar Countermeasures Units in the US Navy

#1944Revisited – Locating Japanese Radars: The First Dedicated Radar Countermeasures Units in the US Navy

By Thomas Wildenberg

Editor’s note: In 2024, From Balloons to Drones will publish a series of articles that seek to provide a new perspective on the air war in 1944. If you are interested in contributing, please see our call for submissions here.

The US Navy was unprepared for electronic warfare when the Second World War started. After the US Marines landed on Guadalcanal in August 1942, they were surprised to discover the presence of a Japanese early warning radar, something the US Navy was unaware of. Although several radar countermeasures (primarily radar receivers designed to detect enemy radars) were quickly devised by the Naval Research Laboratory, little or no provision was made for installing the gear in the US Navy’s aeroplanes. It was done on an ad hoc basis. It took two years of trial and error before the US Navy realised that to conduct radar countermeasures (RCM) effectively, it needed aeroplanes specifically outfitted for this purpose with crews that were trained in the use of the latest equipment. This article explores that experience of learning. Once this was achieved, the US Navy could locate and plot the enemy’s early warning radars. This enabled attacking aeroplanes to avoid them, thus reducing the likelihood of their interception from Japanese fighters. Though the equipment supplied to these aeroplanes was never intended for use in air-to-air encounters (radar-equipped night fighters had their own specialised equipment), the well-equipped, well-trained crews of the RCM Consolidated PB4Y-1 Liberators that began arriving in the Pacific towards the end of 1944 discovered that they could use their RCM receivers to guide them to enemy aeroplanes also equipped with radar allowing it to be intercepted and shot down.[1]

Consolidated_PB4Y-1_Liberator_takes_off_from_Eniwetok_Airfield_on_16_April_1944_(80-G-K-1690)
A US Navy Consolidated PB4Y-1 Liberator patrol bomber taking off from Eniwetok Airfield (Stickell Field), 16 April 1944. (Source: Wikimedia)

VP-104 and Learning Lessons

In the spring of 1943, Lieutenant Lawrence Heron, one of several newly trained naval officers in the use and maintenance of the ARC-1 radar receiver (the primary RCM equipment available at that time), was sent to Guadalcanal and assigned to join VP-104 operating PB4Y-1 Liberators out of Carney Field (also known as Bomber 2). When Heron arrived in Guadalcanal, none of the PB4Y-1s were equipped with any RCM equipment. He had to figure out how to install the only radar receiver to transfer it from aeroplane to aeroplane. He solved this problem by mounting the ARC-1 receiver (the US Navy version of the US Army SCR-587) and its power supply on pieces of sawn plywood sized to fit through the aeroplane hatches. These were fastened to a table in the aeroplane interior, and a power cable was connected to the electric power system. He flew twenty missions to such places as Truk, Kapingamarangi in the Caroline Islands, and Rabaul – the latter particularly harrowing as it was so heavily defended.[2]

Forming Field Unit No. 3

By April 1944, it was clear to the leadership in the Southwest Pacific Command that permanently modified aeroplanes, such as the US Army Air Force’s Ferrets (modified aeroplanes such as the Boeing B-17 Flying Fortress and Consolidated B-24 Liberator) flown by crews to intercept radar signals, were far more effective in finding enemy radars than the makeshift radar receiver installations on US Navy bomber and reconnaissance aeroplanes operated by ‘gypsy’ crewman like Heron and his predecessors in Cast Mike 1 (the first US Navy RCM unit deployed to the Pacific Theatre in September 1942). Recognising this shortcoming, the Command’s headquarters was directed to form a dedicated airborne US Navy RCM unit. Lieutenant Heron was sent to the seaplane base at Palm Island near Townsville, Australia, with orders to establish and command Field Unit No. 3, a US Navy RCM unit using two PBYs specifically modified for this purpose.[3]

After arriving in Palm Island, Heron had no difficulty installing the ARC-1 receivers, but no direction-finding antennae were available. He solved the problem by having his men make their own from aluminium tubing. They melted the insulation from spare coaxial for the mount, machining it after it had hardened. The rotating antenna was mounted in the bottom of the flying boat’s fuselage behind the rear tunnel gun hatch and had to be attached after the aeroplane was airborne. As Heron recalled:

I would go back to the tunnel hatch of the aircraft – I wouldn’t ask an enlisted man to do it – and put on a safety belt fastened with a steel cable to the frame of the aircraft, then, with one of the enlisted men holding my feet, I would hang out the bottom of the airplane and fasten the antenna with wing nuts on the bottom of the fuselage. There were lots of occasions when I dropped wing nuts into the water 700 or 1,000 feet below. It wasn’t very pleasant […] Once the antenna was in place, somebody had to sit over the open tunnel hatch and operate the handle which rotated the dipole, using the interphone to coordinate with the RCM operator to get bearing information.[4]

When the modifications to Heron’s PBYs were complete, he took the unit to New Guinea and began flying RCM missions from seaplane bases at Port Moresby and the Samarai Islands. Although the jury-rigged direction-finding antenna gave satisfactory results, installing it was an extremely hazardous operation. During one flight, Heron’s aeroplane came under friendly ground fire. As the pilot maneuvered wildly to avoid being hit, Heron was thrown out of the hatch and back again several times. “If it hadn’t been for the steel safety cable,” he said, “I would probably be somewhere at the bottom of the ocean.”[5]

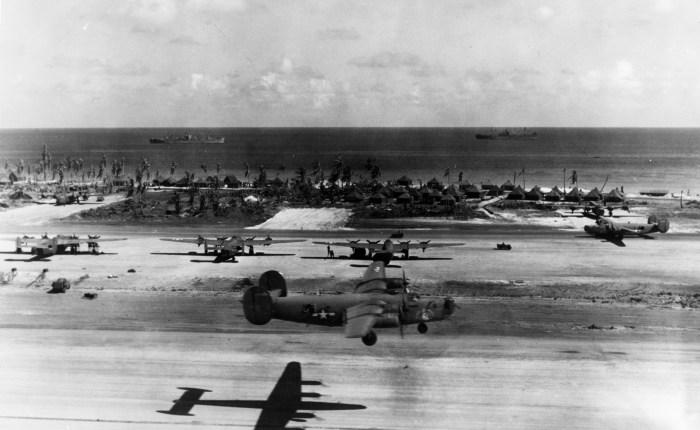
As the US Navy’s island-hopping campaign advanced toward Japan, RCM operations (today called electronic intelligence or ELINT) were organised from newly established bases on the captured islands. When Enewetak Atoll was secured on 20 February 1944, control of the Marshall Islands, which had been in Japanese hands since 1914, passed to the United States. Within a week, engineers from the US Army’s 110th Battalion were hard at work constructing a bomber airstrip, later named Stickel Field. When completed in March, it had a 400-foot-wide, 6,800-foot-long runway with two taxiways, facilities for major engine overhaul, and Quonset huts for housing personnel.

VPB-116 and Operations in the South Pacific

On 7 July 1944, PB4Y-1 Liberators of VPB-116, under the command of Commander Donald G. Gumz, began arriving on Enewetak. At least three of the planes in the squadron were equipped with specialised radar receivers and search radar. However, they were not equipped with the new APR-5 receiver, which would have greatly simplified the task of locating enemy radars. The squadron commenced operational patrols and sector searches on 12 July and was conducting missions against Truk, Japan’s main naval base in the South Pacific, by the first week in August. By then, the US Navy was aware of the shore-based air-search radars the Imperial Japanese Navy deployed. It had developed techniques for locating them with RCM aeroplanes to minimise their effectiveness. Although Truk had been pounded in February, its airfields continued to be a threat to US forces in the area, so bombings of the atoll continued. To ensure the attacking forces’ safety, the US Navy air force commander in the forward area asked Gumz to attempt to pinpoint the location of the Japanese radar equipment on Truk. Unbeknownst to Gumz or the higher authorities in the US Navy, there were no less than nine enemy air-search radars installed at various locations around the atoll.[6]

Gumz quickly discovered that getting a bearing on the Japanese radar transmissions operating below or just above the 100 MHz minimum range of the ARC-1 receiver was very difficult. To locate the radars, Gumz produced a plan to search for holes in the enemy’s radar screen using three RCM planes simultaneously running concentric circles around Truk lagoon at different altitudes. It took six-night sorties and a low-level morning strike on shipping to locate the radar source on Moen Island and the radar shadows created by certain islands. The information gained during this and other ELINT flights in the area allowed for follow-on raids to be planned so that the Japanese radars would provide minimum warning of the attacking forces’ approach.

An Air-to-Air Engagement

On 1 November 1944, one of the most remarkable air-to-air engagements of the Second World War occurred between an RCM PB4Y-1 under the command of Lieutenant Guy Thompson and a Japanese Kawanishi H8K Emily flying boat. It was also the first time in the history of electronic warfare that ELINT was used to locate and identify an enemy aeroplane so that it could be engaged and shot down by the sensing aeroplane.

Thompson took off that morning from Stickel Field on a mission to escort the submarine USS Salmon (SS-182), which could not submerge after severe damage and was making its way to Saipan. Tompson’s PB4Y-1 was equipped with an APS-15 search radar, which replaced the bottom gun turret, and the newest radar receivers and analysers, including the APR-5 radar receiver that picked up signals in the S-band used by search and early warning radars. On the way to the estimated location of the Salmon, at approximately 1100 hours, Aviation Chief Radio Technician W.T. Kane, monitoring the RCM gear, intercepted an enemy radar transmission that he estimated to be 75 to 90 miles away. The signal received on his instruments indicated that the emissions were not coming from a rotating antenna, as used in ground-based early warning radars, indicating that it was coming from another aeroplane.[7]

As the PB4Y-1 headed towards the emission source, Aviation Chief Radioman E.F. Bryant, operating the APS-15 radar, began searching for the enemy aeroplane. Thirty minutes after the initial contact, the radar screen revealed a contact nine-and-a-half miles distant at 1:30 o’clock low. As Bryant reported the contact, another crew member called out a visual sighting. Thompson let the Japanese plane pass to starboard before initiating a 180-degree turn to come in behind the flying boat, nosed over into a glide to pick up speed, and began closing the gap to the enemy plane below him. To catch the enemy plane, which had picked up speed, “Thompson put on more power and went into a steeper dive, building his sped up to 299 mph and closing to a point 2,000 feet behind and 500 feet above the Emily.” Thompson’s bow turret gunner immediately opened fire, initiating a dogfight that saw both flying boats wildly manoeuvring as Thompson fought to bring all the PB4Y-1’s guns to bear. At the same time, the enemy tried to evade. To gain speed, both aeroplanes dropped their depth bombs. Thompson’s gunners rake the Emily from point plane range, setting both engines on fire. Moments later, its starboard wing float hit the water, tearing off the wing and sending the flying boat cartwheeling into the ocean.[8]

Conclusion

As the US Navy advanced across the Pacific, new radar countermeasures units arrived in the theatre, providing detailed maps showing the location of all the Japanese radars, such as the one below.

Radar map
Japanese radar coverage of the Philippines (Source: Author’s Collection)

This information allowed attacking raids to follow flight plans that would provide a minimum warning to the Japanese. By the end of the Second World War, 18 land-based US Navy patrol squadrons had been modified to carry improved radar receivers and one of the three airborne jammers the Radar Research Laboratory developed.[9] These units were built upon the experience and lessons learned by Heron and Gumz in 1943 and 1944.

Thomas Wildenberg is an award-winning scholar with special interests in aviators, naval aviation, and technological innovation in the military. He is the author of several books on various naval topics and biographies of Joseph Mason Reeves, Billy Mitchell, and Charles Stark Draper.

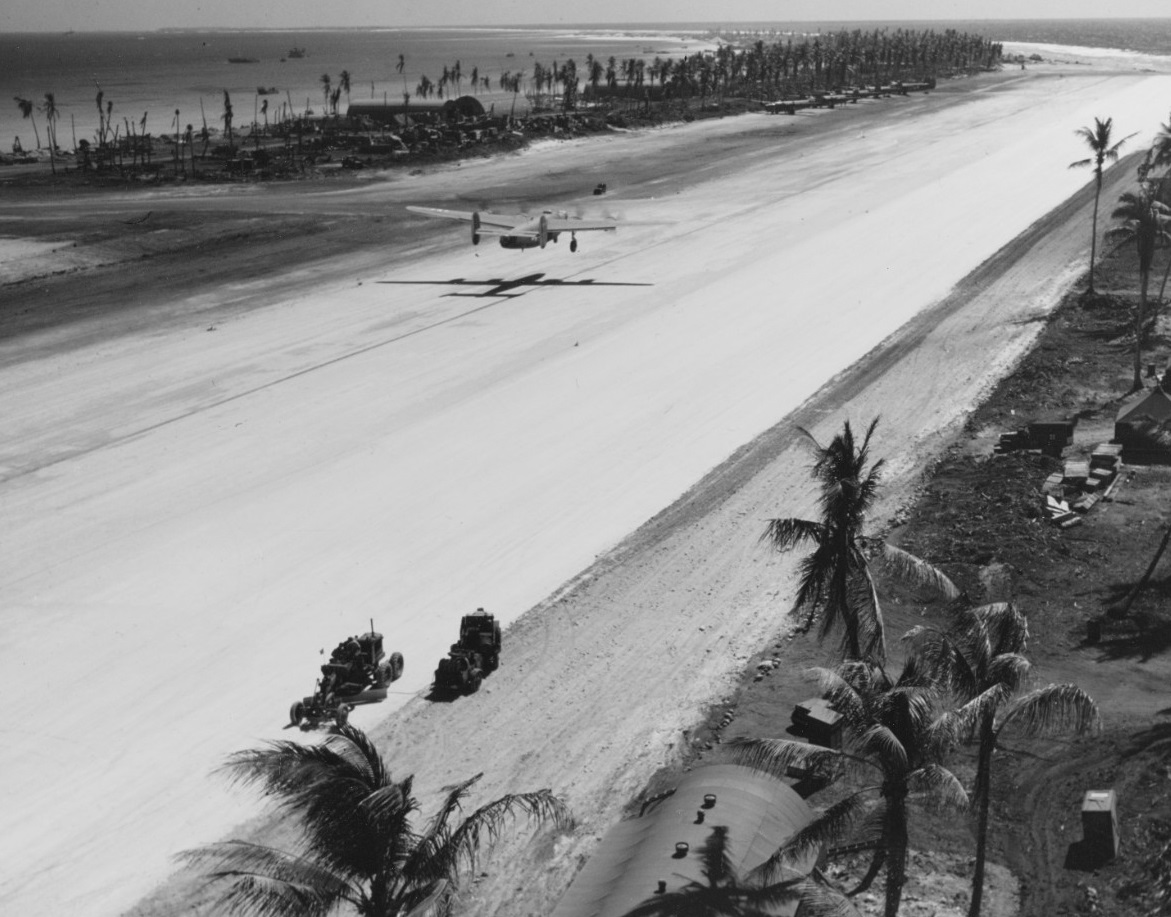
Header image: A US Navy Consolidated PB4Y-1 Liberator patrol bomber taking off from Eniwetok Airfield (Stickell Field), 13 April 1944. The photo was taken from the top of the observation tower. (Source: Wikimedia)

[1] For more on this topic see: Thomas Wildenberg, Fighting in the Electromagnetic Spectrum: U.S. Navy and Marine Corps Electronic Warfare Aircraft, Operations, and Equipment (Annapolis, MD: Naval Institute Press, 2023), pp. 9-19.

[2] Alfred W. Price, The History of U.S. Electronic Warfare – Volume I: The Years of Innovation—Beginnings to 1946 (Arlington, VA: Association of Old Crows, 1984), pp. 137-8; Craig A. Bellamy, ‘The Beginnings of the Secret Australian Radar Countermeasures Unit During the Pacific War’ (PhD Thesis, Charles Darwin University, 2020), p. 192.

[3] Price, The History of U.S. Electronic Warfare – Volume I, p. 138.

[4] Lawrence Heron, cited by Price, The History of U.S. Electronic Warfare – Volume I, pp. 145-7.

[5] Price, The History of U.S. Electronic Warfare – Volume I, p. 147.

[6] Michel D. Roberts, Dictionary of American Naval Squadrons – Volume I: The History of VA, VAH, VAK, VAL, VAP and VFA Squadrons (Washington DC: Naval Historical Center, 1995), p. 623; Price, The History of U.S. Electronic Warfare – Volume I, p. 144.

[7] Edward M. Young, H6K “Mavis”/H8K “Emily VS PB4Y-1/2 Liberator/Privateer Pacific Theater 1943-45 (London: Osprey Publishing, 2023).

[8] Young, H6K “Mavis”/H8K “Emily VS PB4Y-1/2 Liberator/Privateer Pacific Theater 1943-45.

[9] Thomas Wildenberg, ‘Fighting in the Electromagnetic Spectrum: U.S. Navy and Marine Corps Electronic Warfare Aircraft, Missions, and Equipment,’ lecture given at the Johns Hopkins Applied Physics Laboratory, 14 June 2024.

#Podcast – “Keep ‘Em Flying!”: An Interview with Dr Stan Fisher

#Podcast – “Keep ‘Em Flying!”: An Interview with Dr Stan Fisher

Editorial Note: Led by Editor Dr Mike Hankins, From Balloons to Drones, produces a monthly podcast that provides an outlet for the presentation and evaluation of air power scholarship, the exploration of historical topics and ideas, and provides a way to reach out to both new scholars and the general public. You can find our Soundcloud channel here. You can also find our podcast on Apple Podcasts and Google Podcasts.

The Pacific Theater of the Second World War was massive and had vast numbers of ships and aeroplanes. Keeping a force like that operational and effective takes tremendous work behind the scenes. In our latest episode, Dr Stan Fisher takes us through his new book, Sustaining the Carrier War: The Deployment of U.S. Naval Air Power to the Pacific, to show the often overlooked people behind the scenes: the mechanics and maintainers who kept the planes working and kept the carriers able to keep air power in the air in the war against Japan.

Version 1.0.0

Dr Stan Fisher, a commander in the U.S. Navy, is an assistant professor of naval and American history at the United States Naval Academy.  Before transitioning to the classroom, he accumulated over 2,500 flight hours as a US Navy pilot, mainly in SH-60B & MH-60R Seahawk helicopters. He earned a commission through the Naval Reserve Officer Training Corps in 1997 and has multiple deployments on frigates, cruisers, and aircraft carriers. Fisher has also served as a weapons and tactics instructor, squadron maintenance officer, and operational test director. Additionally, he has completed tours of duty in engineering and acquisitions at the Naval Air Systems Command.  He is a past recipient of the Samuel Eliot Morison Naval History Scholarship and earned his PhD from the University of Maryland.

Header image: USS Intrepid (CV-11) operating in the Philippine Sea in November 1944. Note the Grumann F6F Hellcat fighter parked on an outrigger forward of her island. (Source: NH 97468, US Naval History and Heritage Command)

#BookReview – Black Snow: Curtis LeMay, the Firebombing of Tokyo, and the Road to the Atomic Bomb

#BookReview – Black Snow: Curtis LeMay, the Firebombing of Tokyo, and the Road to the Atomic Bomb

James M. Scott, Black Snow: Curtis LeMay, the Firebombing of Tokyo, and the Road to the Atomic Bomb. W.W. Norton: New York, NY, 2022. Hbk. 420 pp.

Reviewed by Dr Brian Laslie

9781324002994

There will always be an inevitable struggle between popular historians writing for the general public and academic authors whose writing is often aimed at those working in the so-called ‘ivory tower’ of academia. However, the work of academic historians inform that of popular historians whose work reaches a wider audience of readers, some of whom are thus, in turn, inspired to become academics. This was certainly how I became interested in the profession of being a historian. Nevertheless, every so often, an author comes along who is that rarest of creatures: the unicorn, or that rare writer who blends academic credentials and methodology and the ability to spin a readable tale. James Scott is that unicorn with his new book, Black Snow: Curtis LeMay, the Firebombing of Tokyo, and the Road to the Atomic Bomb. Scott, a journalist and former Nieman Fellow at Harvard University, is the author of several best-selling history books, including Rampage: MacArthur, Yamashita, and the Battle of Manila and Target Tokyo: Jimmy Doolittle and the Raid That Avenged Pearl Harbor, which was a finalist for the Pulitzer Prize in history.

The history of America’s strategic bombing during the Second World War has recently been sensationalized with the publication of Malcolm Gladwell’s The Bomber Mafia (2021). However, Black Snow is, in reality, the Bomber Mafia book you have wanted to read. Indeed, if Gladwell’s book was an appetizer, then this is the main course and dessert. Scott more fully explores the background and motivations of Generals Haywood Hansell and Curtis LeMay and, given the length of Scott’s work, produces a much more coherent explanation of how and why each man acted in accordance with their desires to end the war. Black Snow, focusing on the experience of Japan’s civilian population on the ground, is also reminiscent of Stephen Bourque’s Beyond the Beach (2018) and Richard Overy’s The Bombers and the Bombed (2014). Each of these volumes provides well-needed reminders of the horrific suffering faced by those on the receiving end of bombings. Moreover, Scott is at his best when describing the situation on the ground from the perspective of the Japanese who lived through the bombing. To achieve that end, Scott interviewed 11 survivors and spent research time at archives in the United States and the Center for the Tokyo Air Raids and War Damage, the Kyoto Museum for World Peace, and other institutions in Japan.

39th_Bombardment_Group_B-29_bombing_to_Hiratsuka_19450716
A cockpit view of two 39th Bomb Group B-29s out of North Field (Andersen) on a mission to Hiratsuka, Japan, 16 July 1945. (Source: Wikimedia)

While other books have focused on the strategic bombing campaigns against Japan, such as Herman S. Wolk’s Cataclysm (2010), Barrett Tillman’s Whirlwind (2010), Daniel Schwabe’s Burning Japan (2015), and Kenneth Werrell’s Blankets of Fire (1996), few have done as well as Scott has in presenting a comprehensive treatment. Once again, Scott’s focus on those on the ground is where this book truly adds to the conversation and the historical record. While the morality of the bombing of Japan is not the subject of this review, and there is, again, a wide literature on the subject, Scott’s ability to detail and compare the actions of some of Japan’s citizens against those wing commander – and future commander of the United States Air Force’s Strategic Air Command – Thomas Power is thought-provoking rather one is an expert in the field or coming to this area fresh. Power called the bombing of Japan ‘the greatest show on earth’ (p. 248).

Black Snow is geared towards a wide audience and not for the expert in the field. Given this, one area where the book may be seen to fall down to those with more detailed knowledge of the subject is in the book’s biographies of Generals Henry “Hap” Arnold (pp. 13-9) and LeMay (pp. 97-109). These are slightly overextended to someone who is not approaching the subject for the first time. However, this is really a minor critique.

Overall, Black Snow is a terrific addition to the historiography of the use of air power in the Pacific War of the Second World Ward. As mentioned, the work will appeal to both buffs and scholars alike, and both will find much to engage within these pages. Black Snow is a needed addition to the conversation of what air power can and cannot do, but more importantly, what air power can do when restraints are removed and why the United States must guard against unrestricted aerial warfare in future conflicts.

Dr Brian Laslie is a US Air Force Historian and is the Command Historian at the United States Air Force Academy. Formerly he was the Deputy Command Historian at North American Aerospace Defense Command (NORAD) and United States Northern Command (USNORTHCOM). A 2001 graduate of The Citadel and a historian of air power studies, he received his Masters’ from Auburn University Montgomery in 2006 and his PhD from Kansas State University in 2013. He is the author of Air Power’s Lost Cause: The American Air Wars of Vietnam (2021),  Architect of Air Power: General Laurence S. Kuter and the Birth of the US Air Force (2017) and The Air Force Way of War (2015). The latter book was selected for the Chief of Staff of the Air Force’s 2016 professional reading list and the 2017 RAF Chief of the Air Staff’s reading list. He can be found on Twitter at @BrianLaslie. 

Header image: A Boeing B-29A Superfortress of the 6th Bombardment Group on a mission to Osaka, Japan, 1 June 1945. (Source: Wikimedia)

Air Power and the Battle of the Bismarck Sea

Air Power and the Battle of the Bismarck Sea

By Dr Alan Stephens

This week marks the 74th anniversary of the Battle of the Bismarck Sea, arguably the most significant action fought by Australians during World War II.

Between December 1941 and April 1942, Imperial Japanese forces shocked Australians with their victories over the United States at Pearl Harbor and in the Philippines; and over the British Commonwealth in Malaya, Singapore, the Dutch East Indies and Rabaul. When enemy forces occupied northern New Guinea, an invasion of Australia, with its unthinkable consequences, seemed possible. However, supported by their American and British allies, Australia’s servicemen and women regrouped and fought back.

From mid-1942 onwards, Australian victories with American support at Milne Bay and Kokoda, and the triumph of American naval air power at Coral Sea and Midway weakened Japan’s hold on New Guinea. Further Allied successes on New Guinea’s northeast coast at Buna, Gona and Sanananda between November 1942 and January 1943 left the Japanese position substantially weakened.

Then, intercepted radio messages revealed that an enemy convoy would sail from Rabaul with reinforcements for the vital Japanese garrison at Lae on the northeast coast of New Guinea in late-February. This was likely to be Japan’s last throw of the dice in New Guinea. If the convoy were stopped, then so too would be the likelihood of an invasion of Australia

Allied Air Forces under the command of the American General George Kenney immediately began preparing for an all-out assault against the convoy. A critical factor was the brilliant plan largely conceived by the Royal Australian Air Force’s (RAAF) Group Captain William “Bull” Garing. Garing had already fought in Europe for two years with the RAAF’s No. 10 Squadron, and his experience of maritime warfare was to prove decisive.

nwa0471
Group Captain Garing RAAF (standing, right) hands over information to his successor Group Captain McLachlan, seated at the office desk, c. 1943. (Source: Australian War Memorial)

It was Garing who convinced General Kenney of the need for a massive, coordinated attack. Garing envisaged large numbers of aircraft striking the convoy from different directions and altitudes, with precise timing.

Initially, the allies would rely on reconnaissance aircraft to detect the convoy, which would then be attacked by long-range United States Army Air Force (USAAF) bombers. Once the convoy was within range of the allies’ potent anti-shipping aircraft – RAAF Beaufighters, Bostons and Beauforts, and American Mitchells and Bostons – a coordinated attack would be mounted from medium, low, and very low altitudes.

During the waiting period, crews practised their navigation and honed their formation flying, bombing, and gunnery skills.

Six thousand four hundred Japanese troops embarked at Rabaul between 23 and 27 February 1943, and the convoy of eight merchant ships and eight destroyers sailed just before midnight on the 28th, planning to arrive at Lae on 3 March. Air cover was provided by about 100 fighters flying out of bases in New Ireland, New Britain and New Guinea.

The enemy convoy initially was favoured by poor weather, which hampered Allied reconnaissance. It was not until mid-morning on 2 March that USAAF B-24 Liberators sighted the ships. General Kenney immediately launched eight B-17 Flying Fortress heavy bombers, followed shortly afterwards by another 20. The B-17s attacked from an altitude of 2000 metres with 450-kilogram demolition bombs. Later in the day, another strike was made by 11 B-17s whose crews reported that vessels were ‘burning and exploding […] smoking and burning amidships’ and ‘left sinking’.

By nightfall, the enemy was only hours from Lae, which meant that in the morning it would be within range of the entire allied strike force. If the coordinated attack were to succeed, the precise location of the convoy had to be known at daybreak; consequently, throughout the night, it was tracked by an RAAF Catalina from No. 11 Squadron, which occasionally dropped bombs and flares to keep the Japanese soldiers in a state of anxiety. Also during the night, eight RAAF Beaufort torpedo bombers from No. 100 Squadron took-off from Milne Bay to try to use the darkness to their advantage. The heavy frontal weather made navigation hazardous, and only two aircraft found the convoy. Neither scored a hit.

The moment the Allied Air Forces had been waiting for came on the morning of 3 March 1943, when the Japanese convoy rounded the Huon Peninsula. For much of the time the adverse weather had helped the enemy avoid detection, but now clear conditions favoured the allies. Over 90 aircraft took-off from Port Moresby and set heading for their rendezvous point. While the strike force was en route, RAAF Bostons from No. 22 Squadron bombed the enemy airfield at Lae.

550px-battle_of_the_bismark_sea

By 9:30 a.m. the AAF formations had assembled, and by 10:00 a.m. the Battle of the Bismarck Sea had begun.

The allies attacked in three waves and from three levels, only seconds apart. First, 13 USAAF B-17s bombed from medium altitude. In addition to the obvious objective of sinking ships, those attacks were intended to disperse the convoy by forcing vessels to break station to avoid being hit.

Second, 13 RAAF Beaufighters from No. 30 Squadron hit the enemy from very low level, lining up on their targets as the bombs from the B-17s were exploding. With four cannons in its nose and six machine guns in its wings, the Beaufighter was the most heavily armed fighter in the world. The Australians’ job was twofold: to suppress anti-aircraft fire, and to kill ships’ captains and officers on their bridges.

The Beaufighters initially approached at 150 metres above the sea in line astern formation. The pilots then descended even lower, to mast-level height, set full power on their engines, changed into line abreast formation, and approached their targets at 420 kilometres an hour.

It seems that some of the Japanese captains thought the Beaufighters were going to make a torpedo attack because they altered course to meet the Australians head-on, to present a smaller profile. Instead, they made themselves better targets for strafing. With a slight alteration of heading the Beaufighters were now in an ideal position to rake the ships from bow to stern, which they did, subjecting the enemy to a withering storm of cannon and machine gun fire.

127965
A Japanese transport on fire during the Battle of the Bismarck Sea. (Source: Australian War Memorial)

According to the official RAAF release:

[e]nemy crews were slain beside their guns, deck cargo burst into flame, superstructures toppled and burned.

With the convoy now dispersed and in disarray, the third wave of attackers was able to concentrate on sinking ships. Thirteen American B-25 Mitchells made a medium level bombing strike while, simultaneously, a mast-level attack was made by 12 specially modified Mitchells, known as ‘commerce destroyers’ because of their heavy armament. The commerce destroyers were devastating, claiming seventeen direct hits. Close behind the Mitchells, USAAF Bostons added more firepower.

Following the coordinated onslaught, Beaufighters, Mitchells and Bostons intermingled as they swept back and forth over the convoy, strafing and bombing. Within minutes of the opening shots, the battle had turned into a rout. At the end of the action:

[s]hips were listing and sinking, their superstructure smashed and blazing, and great clouds of dense black smoke [rose] into a sky where aircraft circled and dived over the confusion they had wrought among what, less than an hour earlier, had been an impressively orderly convoy.

Overhead the surface battle, 28 USAAF P-38 Lightning fighters provided air defence for the strike force. In their combat with the Zeros which were attempting to protect the convoy, three of the Lightnings were shot down, but in turn, the American pilots claimed 20 kills. Apart from those three P-38s, the only other allied aircraft lost was a single B-17, shot down by a Zero.

With their armament expended the allied aircraft returned to Port Moresby. However, there was to be no respite for the enemy. Throughout the afternoon the attacks continued. Again, B-17s struck from medium level, this time in cooperation with Mitchells and RAAF Bostons flying at very low level. (Incidentally, the Bostons were led by Squadron Leader Charles Learmonth, after whom the RAAF’s present-day base in north-west Australia is named.) At least 20 direct hits were claimed against the by-now devastated convoy.

That was the last of the coordinated attacks. The victory had been won. For the loss of a handful of aircraft, the Allied Air Forces had sunk twelve ships – all eight of the troop transports and four of the eight destroyers – and had killed more than 3,000 enemy soldiers.

The brilliantly conceived and executed operation had smashed Japanese hopes of regaining the initiative in New Guinea and had eliminated any possibility that Australia might be invaded. In the words of the supreme command of the Southwest Pacific Area, General Douglas MacArthur, the Battle of the Bismarck Sea was ‘the decisive aerial engagement’ of the war in the Southwest Pacific.

However, there was still a terrible yet essential finale to come. For several days after the battle, Allied aircrews patrolled the Huon Gulf, searching for and strafing barges and rafts crowded with survivors. It was grim and bloody work, but as one RAAF Beaufighter pilot said, every enemy soldier they prevented from getting ashore was one less for their Army colleagues to face. Moreover, after fifteen months of Japanese brutality, the great immorality, it seemed to them, would have been to have ignored the rights of their soldiers.

128159
A Japanese destroyer steaming astern while under attack by USAAF bombers during the Battle of the Bismarck Sea. (Source: Australian War Memorial)

Japanese media never mentioned the battle, but in a macabre footnote, two weeks later, Tokyo announced that in future all Japanese soldiers were to be taught to swim.

The Battle of the Bismarck Sea was a master-class in air power. The RAAF and the USAAF had smashed Japanese hopes of regaining the initiative in New Guinea; they had forced the enemy into a defensive posture from which ultimate victory was unlikely, and they had eliminated any possibility that Australia might be invaded.

This was arguably Australia’s most important victory in World War II.

This post first appeared at The Central Blue, the blog of the Sir Richard Williams Foundation.

Dr Alan Stephens is a Fellow of the Sir Richard Williams Foundation. He has been a senior lecturer at UNSW Canberra; a visiting fellow at ANU; a visiting fellow at UNSW Canberra; the RAAF historian; an advisor in federal parliament on foreign affairs and defence; and a pilot in the RAAF, where his experience included the command of an operational squadron and a tour in Vietnam. He has lectured internationally, and his publications have been translated into some twenty languages. He is a graduate of the University of New South Wales, the Australian National University, and the University of New England. Dr Stephens was awarded an OAM in 2008 for his contribution to Australian military history.

Header Image: During the Battle of the Bismarck Sea in which the Japanese suffered heavy losses while attempting to reinforce their garrison at Lae, a RAAF Beaufighter attacks a camouflaged Japanese transport. A burst is poured into the burning vessel. (Source: Australian War Memorial)